Backyard Snowboarding Rail Setup!!!


Duration: 7:49
Views: 36K
Submitted: 8 years ago
Description:
KEVIN'S TOP GEAR PICKS
SNOWBOARD: http://bit.ly/2mlOZcJ
JACKET: http://bit.ly/2km8GQy
BOOTS: http://bit.ly/2kIHRIG
GOGGLES: https://goo.gl/o62QuL SAVE 10% CODE: PROCAMP10
MITTENS: http://bit.ly/2vrjdlh
BINDINGS: http://bit.ly/2l9GNyj
HELMET: http://bit.ly/2kml7vT
PANTS: http://bit.ly/2kmorH8
BACKPACK: http://bit.ly/2qheYGe
WAXING IRON: http://bit.ly/2vltSfg
CAMERA: http://bit.ly/2kyFx41
ACCESSORIES: http://bit.ly/2vkWxB5
DRONE: http://bit.ly/2p9XBGZ
SOCKS: http://bit.ly/2pLq6s5
LIFT TICKET DEALS! http://bit.ly/2u9C7L7
MERCH: https://www.snowboardprocamp.com/merch
Check out Joe Clark's Youtube channel:
https://www.youtube.com/channel/UCfqocJhhXN9h69axKN0OoVQ
FOLLOW US & SUPPORT
INSTAGRAM: http://bit.ly/2tJ9p1L
FACEBOOK: http://bit.ly/2uL41QM
PATREON: http://bit.ly/2tIQSmj
CONTACT: snowboardprocamp@gmail.com
SEND US STUFF!
PO Box 317
Whistler, BC, Canada
V0N 1B0
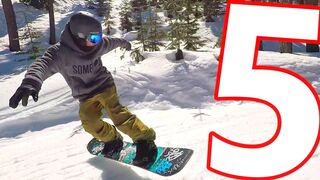
In this video we build a backyard rail and have a backyard snowboarding session! Chris picked up a piece of 10 foot long PVC pipe from the hardware store which makes for a perfect rail to slide down. We needed some type of feet to attach to the PVC pipe and found three plastic boxes we could screw to the bottom. After about an hour of our amateur building we were ready to hit the rail with our snowboards. We had to pack the plastic feet full of snow and move some snow around for the take offs and landings. After an hour long snowboard session I got a few 5050's and boardslides on setup. Tomorrow we take our DIY rail setup into a larger area to improve our pre season snowboarding skills. If you're itching to snowboard a backyard setup is the way to go! Thanks for watching!
SNOWBOARD: http://bit.ly/2mlOZcJ
JACKET: http://bit.ly/2km8GQy
BOOTS: http://bit.ly/2kIHRIG
GOGGLES: https://goo.gl/o62QuL SAVE 10% CODE: PROCAMP10
MITTENS: http://bit.ly/2vrjdlh
BINDINGS: http://bit.ly/2l9GNyj
HELMET: http://bit.ly/2kml7vT
PANTS: http://bit.ly/2kmorH8
BACKPACK: http://bit.ly/2qheYGe
WAXING IRON: http://bit.ly/2vltSfg
CAMERA: http://bit.ly/2kyFx41
ACCESSORIES: http://bit.ly/2vkWxB5
DRONE: http://bit.ly/2p9XBGZ
SOCKS: http://bit.ly/2pLq6s5
LIFT TICKET DEALS! http://bit.ly/2u9C7L7
MERCH: https://www.snowboardprocamp.com/merch
Check out Joe Clark's Youtube channel:
https://www.youtube.com/channel/UCfqocJhhXN9h69axKN0OoVQ
FOLLOW US & SUPPORT
INSTAGRAM: http://bit.ly/2tJ9p1L
FACEBOOK: http://bit.ly/2uL41QM
PATREON: http://bit.ly/2tIQSmj
CONTACT: snowboardprocamp@gmail.com
SEND US STUFF!
PO Box 317
Whistler, BC, Canada
V0N 1B0
In this video we build a backyard rail and have a backyard snowboarding session! Chris picked up a piece of 10 foot long PVC pipe from the hardware store which makes for a perfect rail to slide down. We needed some type of feet to attach to the PVC pipe and found three plastic boxes we could screw to the bottom. After about an hour of our amateur building we were ready to hit the rail with our snowboards. We had to pack the plastic feet full of snow and move some snow around for the take offs and landings. After an hour long snowboard session I got a few 5050's and boardslides on setup. Tomorrow we take our DIY rail setup into a larger area to improve our pre season snowboarding skills. If you're itching to snowboard a backyard setup is the way to go! Thanks for watching!
Sponsored by:
SnowboardProCamp

![Crazy Cart Ride Guide [HD]](https://www.gnarpowpow.com/contents/videos_screenshots/17000/17477/320x180/1.jpg)